Bandolibre user manual
| 🇬🇧 English | 🇫🇷 Français | 🇪🇸 Español |
This manual is for players. It explains how to connect the Bandolibre, set up your music software, use the function buttons and pedals, tune the feel of the bellows, and update the firmware. You don’t need any tools or technical knowledge.
A shared instrument

The Bandolibre is published under the CC BY-NC-SA 4.0 license: you are free to build, repair, modify and share it, for non-commercial use.
It exists thanks to people who gave their time and knowledge freely, in the spirit of L’Atelier du bandonéon libre. Make good use of it: play, teach, experiment. And if you can, pass it on: share what you learn, help someone build theirs, or contribute to the project, so this chain of generosity keeps growing.
Overview
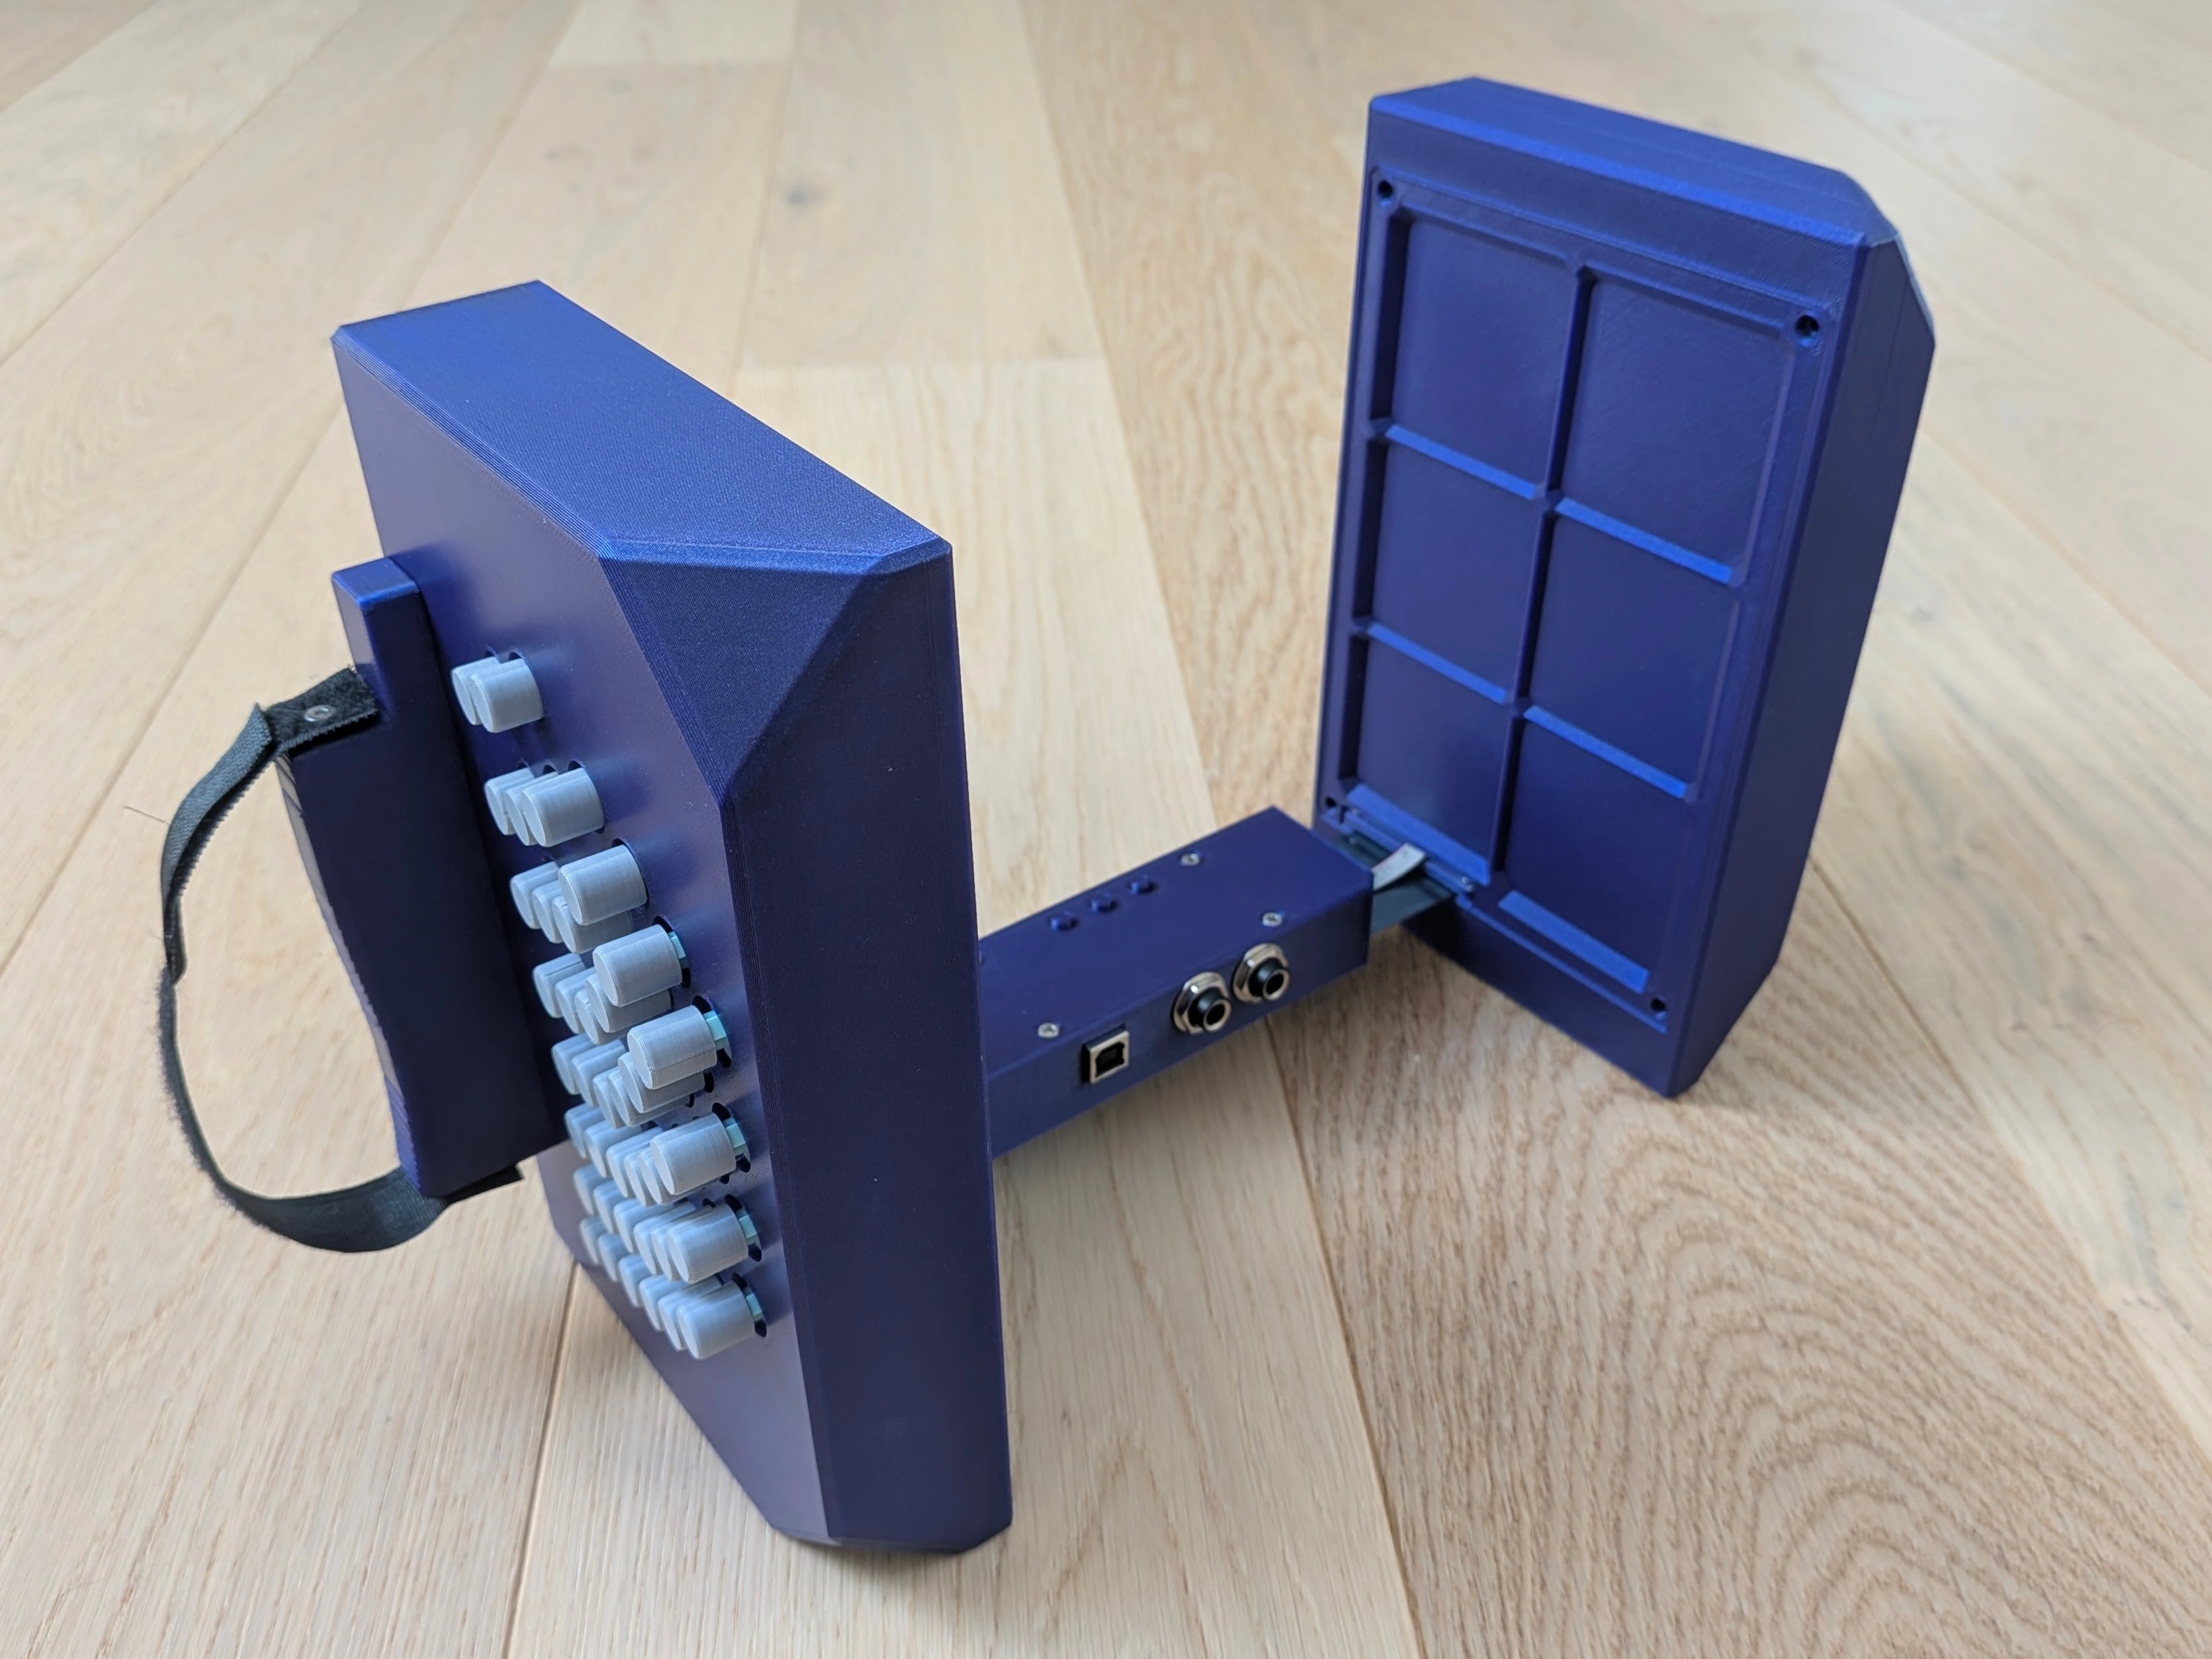
The Bandolibre is a MIDI controller shaped like an Argentine bandoneon. It makes no sound on its own: it sends what you play to a computer, tablet or phone, where a virtual instrument turns it into sound.
- Two keyboards, left and right hand, with the 142-tone Rheinische Tonlage layout.
- Bellows: a spring blade between the two hands. It measures how hard you push or pull, the way a real bellows would respond.
- Three function buttons on the main module: left, middle and right.
- Two pedal inputs (6.35 mm jacks) for expression pedals.
- One USB Type-B port, for both power and MIDI.
Getting started with your instrument
No two Bandolibres come out of the workshop exactly alike: no two magnets are quite identical, and the geometry varies slightly from one instrument to another. For notes to sound only when you push or pull, the instrument has to know where the bellows sits at rest. Calibrate the bellows before you play it for the first time.
Connecting
Plug the Bandolibre into your computer, tablet or phone with a USB Type-B cable. That single cable powers the instrument and carries MIDI. There is no battery, power adapter or driver.
It appears as a MIDI device named Bandolibre.
Setting up your software
In your DAW, notation program or synth app, select Bandolibre as the MIDI input.
- The left hand plays on MIDI channel 1, the right hand on channel 2. You can give each hand its own instrument, or send both channels to the same one.
- The bellows sends CC#11 (Expression) on both channels, continuously while you play. It also sets the velocity of each note: the harder you push or pull when you press a key, the higher the velocity.
- Pedal 1 sends CC#1 (Modulation) and pedal 2 CC#4 (Foot Controller), also on both channels.
Function buttons
Left button: keyboard system
Press the left button to step through the three keyboard systems:
| System | Push and pull |
|---|---|
| Rheinische Tonlage (default) | Different notes (bisonoric), the Argentine bandoneon |
| Peguri | Same note both ways (unisonoric) |
| Manoury | Same note both ways (unisonoric) |
After Manoury it goes back to Rheinische Tonlage.
Middle button: bellows program
Press the middle button to step through three bellows programs: 1 → 2 → 3, then back to 1.
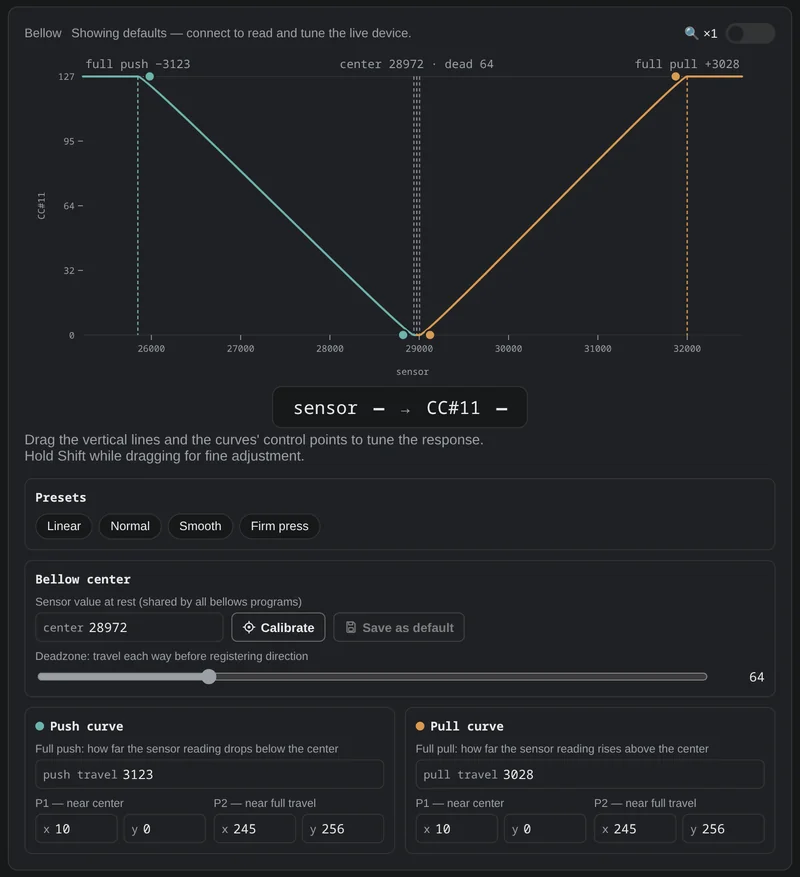
Each program has its own bellows settings: how far you move the bellows before a note sounds, and how your effort turns into loudness. You can tune each of them in the configuration tool. By default, programs 2 and 3 reach full loudness with less bellows effort than program 1. Use them for quiet practice, or if the spring blade feels too stiff. The bellows program has no effect in table mode.
Hold the middle button for one second to calibrate the rest position of the bellows instead: see Bellows calibration.
Right button: table mode
Press the right button to switch table mode on or off.
In table mode you can play with the instrument resting flat on a table. Each key sounds as soon as you press it, without pushing or pulling the bellows. Every key plays its pull note, and every note plays at the same fixed loudness.
This is useful for entering a score into notation software one note at a time. Press it again to go back to normal playing.
Pedals
You can connect up to two expression pedals of the M-Audio EX-P type. If your pedal has a mode switch, set it to M-Audio.
- Pedal 1 sends CC#1 (Modulation).
- Pedal 2 sends CC#4 (Foot Controller).
Most instruments already respond to these controllers. In your DAW you can also use MIDI Learn to assign a pedal to any other parameter.
If a pedal doesn’t cover its full range, or never reaches zero, calibrate it in the configuration tool.
Configuration tool
The configuration tool is a web page that displays and changes the instrument’s settings over USB-MIDI. There is nothing to install.
It works in browsers that support Web MIDI, such as Chrome or Edge, on a computer or an Android phone or tablet. It does not work on iPhone or iPad.
With it you can:
- tune the bellows: drag the push and pull curves, or pick a preset, to choose how your effort turns into loudness;
- calibrate the rest position of the bellows;
- calibrate the pedals;
- switch keyboard system, bellows program and table mode;
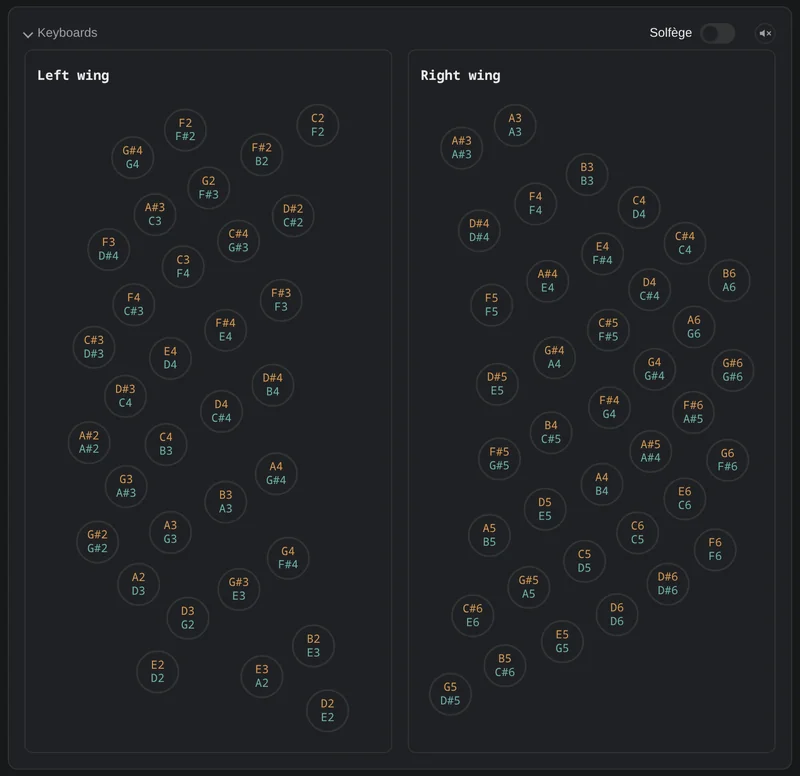
- see both keyboards live as you play;
- save your settings, so the instrument keeps them when unplugged.
Changes apply immediately, so you can adjust the feel while playing.

You can also install it as an app, so it opens from its own icon:
- Android: in Chrome, open the ⋮ menu and choose Add to Home screen.
- iPhone or iPad: in Safari, tap Share, then Add to Home Screen. It installs, but cannot reach the instrument until Apple supports Web MIDI.
- Computer: in Chrome or Edge, click the install icon at the right of the address bar.
Saving your settings
Changes made in the configuration tool apply immediately, but the Bandolibre forgets them when you unplug it, unless you save them. Set the instrument the way you like, then click Save as default: the Bandolibre starts with these settings every time you plug it in. This includes the bellows and pedal settings, and the keyboard system and bellows program chosen with the buttons. Table mode always starts off.
In the tool’s list of settings, saved values are highlighted; hover over one to see the factory value. Updating the firmware keeps your saved settings.
To go back to the settings the instrument came with, open the ⋮ menu above the list of settings and choose Factory reset.
The same menu keeps your settings in a file: Save to file downloads them, Load from file brings them back, for example after a factory reset or on another Bandolibre. Loaded settings apply at once; click Save as default to keep them.
Bellows calibration
The Bandolibre has to know the rest position of the bellows, so that a note sounds only when you push or pull. Calibrate it before you play the instrument for the first time, and again whenever notes sound while the bellows is at rest. There are two ways, and both measure the bellows for one second. Either way, first lay the instrument flat on a table and let go of the bellows.
With the middle button
- Press the middle button with your index finger, your thumb under the main module, so that pressing doesn’t push or pull the bellows.
- Hold the button for one second, until its light turns on.
- Keep the button pressed and stay still until the light goes off, a second later.
- The new rest position is saved: the instrument keeps it when unplugged.
This way needs no computer.
With the configuration tool
- Connect the instrument and open the configuration tool.
- In the bellows section, under Bellow center, click Calibrate. Don’t touch the instrument for one second.
- Click Save as default next to it, so the instrument keeps the new rest position when unplugged.
Making sound
The Bandolibre needs a virtual instrument to make sound. Whatever you use:
- choose an instrument that responds to CC#11, otherwise the bellows has no effect on the sound;
- make it listen on channels 1 and 2 (or on all channels), otherwise one hand stays silent.
For practice, a simple bandoneon soundfont is enough: European Bandoneon V2.5 by Jörg Bleymehl gives good results and works on any device below.
On a computer
Use a DAW (Reaper, Ableton Live, Logic, Cubase…) or a notation program, and load a virtual instrument plugin on the Bandolibre’s MIDI input.
- The physically modelled SWAM instruments from Audio Modeling give the most expressive results: the bellows drives the sound itself, not just its volume.
- Native Instruments Session Strings also works very well.
On an Android phone or tablet
Use the FlowTones app:
- Plug in the Bandolibre and open FlowTones.
- Pick a program with Load. Organ sounds work quite well.
- Link the bellows to the volume with MIDI learn:
-
Open the ☰ menu at the top right and choose MIDI learn settings.
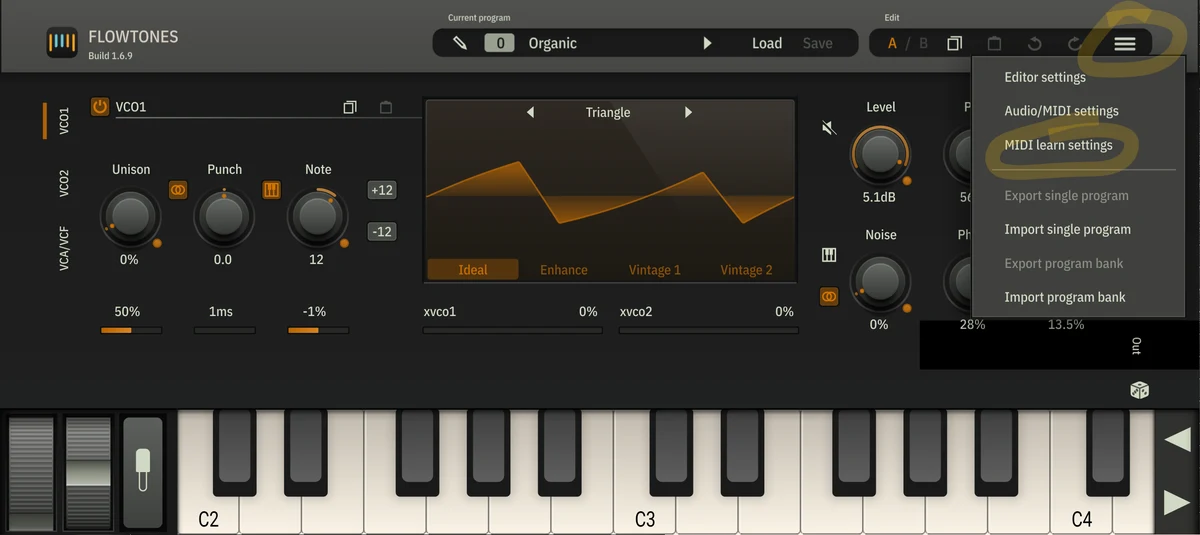
- With the MIDI learn window open, tap the Out tab on the right edge of the screen to show the output pane.
-
Tap the Out volume knob, then push or pull the bellows. A new line appears in the window: MIDI CC 11, mapped to OutGain.
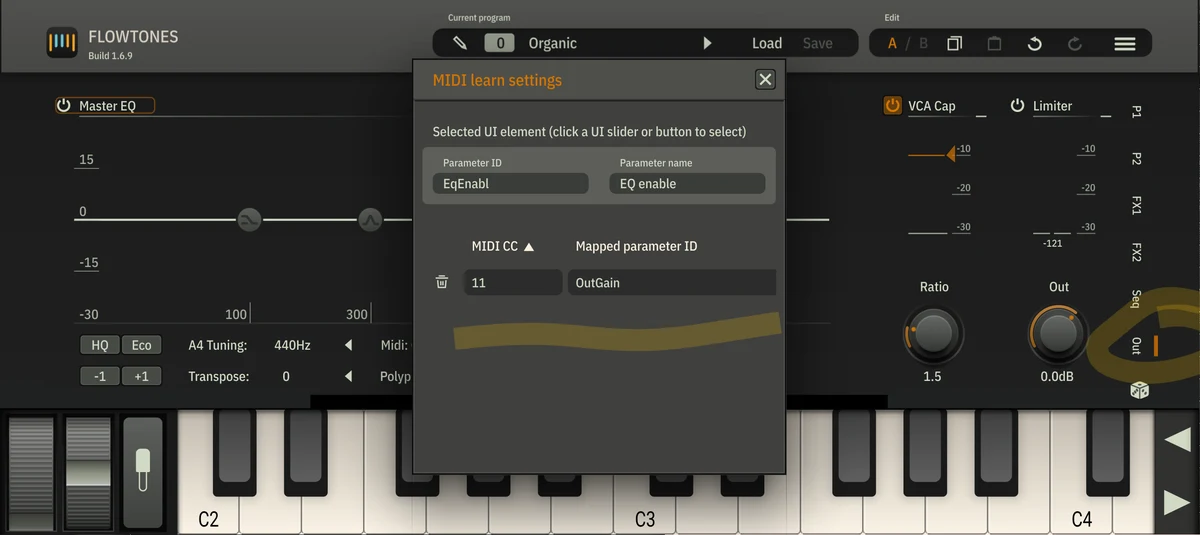
- Close the window. The volume knob now moves with the bellows, and the bellows shapes the loudness of every note.
-
On an iPhone or iPad
The Bandolibre works with Apple’s free GarageBand app: plug it in, open GarageBand and play one of its instruments.
The SWAM instruments also exist for iPhone and iPad. They run on their own or inside GarageBand as a plugin (Audio Unit).
Share what you find
Finding good sounds for the Bandolibre is still an open question, and we are very interested in what you discover. If an app, instrument, soundfont or setting works well for you, or doesn’t, please keep us posted at bandolibre@googlegroups.com.
Updating the firmware
The firmware is the software inside the instrument. You update it over the same USB cable, without installing anything.
From the browser
- Connect the Bandolibre and open the update tool in Chrome, Edge or Firefox.
- The tool finds the instrument and shows its firmware version next to the latest one.
- Click Update firmware. The instrument restarts into its update mode, and squares fill in as the new firmware is written and checked.
- When it is done, the instrument restarts with the new firmware.
Your saved settings are kept. Settings you changed in the configuration tool without saving them are lost when the instrument restarts. The configuration tool and BandoPM can stay open: they wait during the update and reconnect afterwards.
With the BANDOLIBRE drive
This way works without a browser.
- Download the latest firmware file from the
releases page. Its name
carries the version:
main-v1_2.uf2for version 1.2. - Unplug the Bandolibre.
- Hold down the left function button and plug the cable back in. Keep holding it until a drive appears.
- A drive called BANDOLIBRE appears, like a USB stick. The light above the left button blinks slowly while it waits.
- Copy the firmware file onto that drive.
- The light blinks faster during the copy, then stays on for about a second. The drive then disappears and the Bandolibre restarts with the new firmware.
The drive exists only to receive the firmware file; files copied onto it do not stay there.
If something goes wrong
- The update from the browser stopped: the page closed, or the cable came out. Nothing is damaged: the instrument waits in its update mode until it gets a complete firmware. Open the update tool again and click Resume update.
- The copy was interrupted, or the cable came out. Nothing is damaged: the new firmware is only installed once the whole file has arrived. Start again from step 2.
- The BANDOLIBRE drive appears without you holding the left button. The instrument
found no valid firmware and is waiting for one. Copy the
.uf2file again. - Nothing happens when you copy the file. Check that it is the
main-v….uf2file from the releases page. Any other file is ignored, so a wrong file cannot damage the instrument. - The drive does not appear. Hold the left button before plugging in the cable, and keep holding it for a second or two afterwards.
Troubleshooting
No sound at all
- Check that Bandolibre is selected as the MIDI input in your software.
- Check that the instrument listens on channel 1 (left hand) and channel 2 (right hand), or on all channels.
- Push or pull the bellows while pressing a key, or turn on table mode (right button).
- Check that your instrument responds to CC#11: some stay silent while CC#11 is at 0.
A note keeps sounding after you release the key
- Unplug and reconnect the Bandolibre. Most software also stops stuck notes on its own when the instrument is disconnected.
Getting help
Questions, problems or ideas? Write to the association:

To be told when boards, kits or finished instruments become available:

For commercial use, contact the association at bandolibre@googlegroups.com.